Secure Visitor Entry Center
The best practices and mechanics for safe and secure school entrances.
Partner Alliance for Safer Schools
White Paper: Secure Visitor Entry Center
The volunteers who make up the Partnership Alliance for Safer Schools (PASS) bring together their research and expertise from the education, public safety and industry communities to develop and support a coordinated approach to make effective use of proven security practices for schools. The PASS team is also dedicated to developing white papers on specific, school-safety topics.
The content in these white papers may point to specific products, brands, or organizations as illustrations of how certain safety and security measures are implemented. PASS does not endorse specific products or brands. Together, the volunteers and partners of the PASS share a single vision: making all schools safer is both achievable and urgently needed.
AUTHORS
Main Author: Benjamin Crum, President, Architectural Security Design Group
Contributors:
- Guy Grace, K-12 Unified Security Advocate/Consultant, Apple To Apple
- Jim Crumbley, President/CEO, Risk Response Team, Inc.
- Scott Lord, Solutions Consultant, Electronic Contracting Company
- Ken Cook, Director of National School Safety and Advocacy, Allegion U.S.
KEY TOPIC
Best Practices and Mechanics for Safe and Secure School Entrances
PROBLEM SOLVED
School entrances require constant access by a wide variety of parties, while at the same time, are the most critical area for a school to secure. This creates a surprisingly complex set of issues to address. This white paper provides schools with a workable and comprehensive approach to safe and secure entries based on industry best practices and research.
RELEVANT PASS GUIDELINES SECTION/S
Property Perimeter Layer
- Architectural Component ……..44
Parking Lot Perimeter Layer
- Architectural Component ……..52
Building Perimeter Layer
- Policies and Procedures Component ……..57
- Communication Component ……..59
- Access Control Component ……..60
- Video Surveillance Component ………61
MOST RELEVANT FOR
- School administrators and safety officers
- Government safety administrators
- Public safety personnel
- School board members and other governance stakeholders
- Systems integrators and consultants
TIME TO READ
17 minutes
Introduction
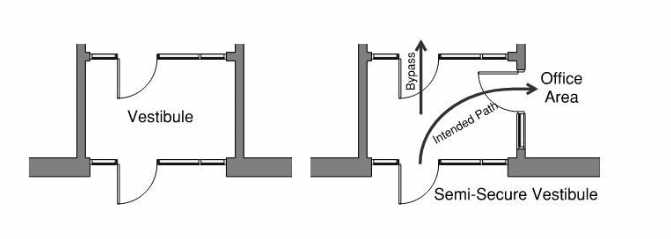
In schools today, the secure vestibule performs various similar functions, limiting the direct access of a number of people into the building at a given time, while providing a secure space to verify the visitor is permitted to be in the school. Unfortunately, what most people consider “secure vestibules” are only “semi-secure vestibules” due to the fact that a visitor can bypass the intended entry sequence and gain access to the building by piggybacking or tailgating (the act of following a staff member or a student entering the building), grabbing a door while someone is leaving, or taking the opportunity to enter when someone inside the building opens the interior door for them.
Notes on Definitions: The PASS Guidelines define primary entrances as the main entrances and even entrances where access to the building is both controlled and monitored. Also, to avoid confusion with the multitude of definitions and understandings of what a “secure vestibule” encompasses, PASS is introducing the terminology of “secure visitor entrance” and “secure visitor entry center.”
Technical Overview
Historically speaking, a “vestibule” is a space used to protect the interior climate of the building from the exterior climate, typically in colder climate areas where the building would be heated, and the vestibule prevents the heat from escaping. Therefore, in warmer climate zones, vestibules were not commonly utilized since passive cooling would be used to keep the building at an acceptable temperature. Through the years, as mechanical cooling became more widely used, vestibules were added to buildings to provide a buffer between the extreme climate conditions, this time with the cold air maintained on the inside of the building. These approaches were strictly from an energy savings point of view, limiting the amount of air transfer that would need to be reheated or cooled.
Turning this space into a “secure vestibule” can be achieved by simply locking the doors. The idea of a secure vestibule can be traced back to medieval times, and beyond, when the portico was used to limit the number of people that could come through the main entrance of the castle at one time. The exterior opening would be closed and secured before the interior opening would be opened. This system of two secure openings also meant that anyone determined to gain access by brute force would have two layers to overcome.
Visitor Verification Procedures
- Proper state or federal photo ID
- Purpose for visiting the school
- Sign-in visitor log that includes name and phone number
- Provide a visitor badge with the date
- Screen visitor with the list the school has created for individuals that are not allowed in the building
- Running the visitor’s information, when possible, through state or federal child protection databases
Direct vs. Indirect
Direct contact is when there is face-to-face communication, even if a clear barrier is between the two parties.
Indirect contact is when an electronic device is used to allow staff to interact with visitors from a remote location.
Solution
First and foremost, ALL exterior doors should be locked. PASS K12 Tier I Guidelines recommended that all exterior doors be locked and monitored for closed and locked status. Secondly, installing clear wayfinding signage directing visitors from anywhere on the campus to the appropriate visitor entrance, as well as informational signage at the door explaining the proper procedure for gaining access to the building, helps to avoid confusion and the potential for “I didn’t know where I was supposed to go.” Consideration should also be given to any multi-language requirements for the community.
Ideally while still on the exterior of the building, visitors should be able to utilize indirect communication with staff through an intercom or phone system prior to gaining access to any portion of the building. Indirectly identifying who a person is and whether or not they truly need to be at the building is the first step in the verification process. Once a visitor has completed this, only then should they be allowed to enter the secure space inside the building, where the verification process can continue. Utilizing a video doorbell system at the exterior visitor entrance door enables staff to interact with a visitor with both audio and video, allowing visual identification. Care should be given to the mounting of the video camera to provide a clear view of the visitor’s face. Wherever possible, additional cameras that show the approach to the entrance, the interior of the vestibule/visitor area, and the space beyond the vestibule/visitor area should be installed and monitored from the office area.
In many existing school buildings, this vestibule space is often shared with the main entrance, therefore creating only a “semi-secure vestibule” for the reasons previously mentioned, even when direct access to an office area is provided off the vestibule.
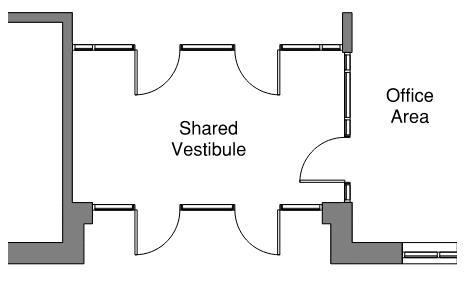
Providing a physically separate access point is essential to creating a truly secure visitor entrance.
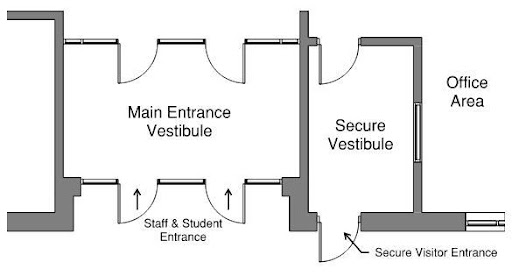
This separate space provides the opportunity for staff to safely have direct communication with a visitor while continuing the verification process. Direct communication can be achieved through a secure glazing system, to afford a level of protection without hindering communication, and is available at a variety of security levels.
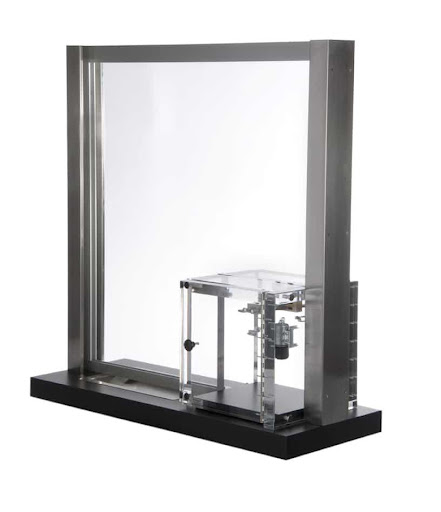
Additionally, providing a means to transfer paperwork and small objects, like textbooks and lunchboxes, accommodates a majority of the reasons for someone coming to the school, while avoiding further access into the building. Achieving this could be as simple as providing a table for these items to be left on or by installing a teller tray and/or package transfer box. Locating the visitor management system in this space allows visitors who have legitimate reasons for entering the building to sign in, while also allowing for an additional step in the verification process before permitting access to the office reception/waiting area.
The combination of a separate entrance into a secured space, along with providing a secure means of direct communication, access to the visitor management system, and the ability to safely transfer items together, creates a “secure visitor entry center.”
The doors leading to and from the secure visitor entry center should be equipped with access control hardware that permits staff to remotely allow visitors through each subsequent layer.
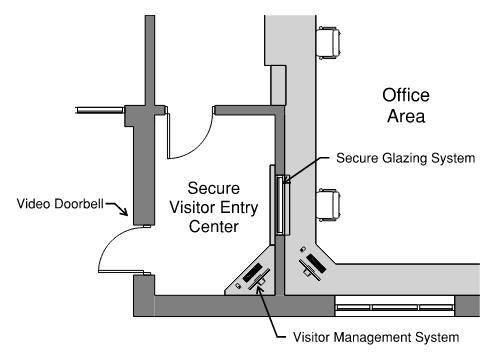
This set of doors can be linked together, whereas the open door must close and latch before the subsequent door can be opened, commonly referred to as a “mantrap.” This prevents the possibility of a person being able to “tailgate.” Even if visitors were able to get through one door, staff would have the ability to deny access through the second door.
Only after a visitor has proven a legitimate reason for needing access into the building, has then signed in, and completed all appropriate security checks, should they be allowed into the office reception/waiting area. Design considerations for this space should include the ability for staff to continue their interactions with approved visitors, as well as seating areas for visitors waiting to meet with staff or pick up a student. Providing direct access to meeting spaces, offices, and restroom facilities from the waiting area reduces the overall area of the building that the majority of visitors would need access to, creating a “secure administration zone.”
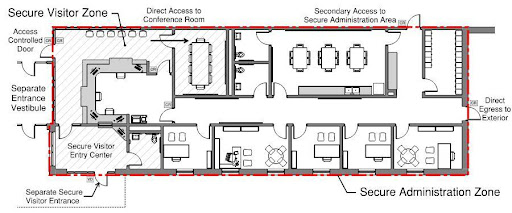
There are a variety of ways to arrange secure visitor entrances, and many schools can easily modify existing entrances to provide a level of security while still retaining the openness of the facility. To assist with this process, PASS recommends the tiered approach in its guidelines to provide schools and districts with a method to establish a secure visitor entrance. By applying this approach, schools have the ability to make changes immediately while continuing to enhance security for staff and students over time.
One overarching element in creating a secure visitor entrance is ensuring that the school and/or district has proper policies and accountability processes in place. Writing a policy and training staff on said policy, is just one aspect. The visitor management process should have an accountability process and documentation to ensure the process is followed correctly. While the visitor management process will focus on the secure visitor entry process, provisions should also include policies regarding all other exterior doors around the building.
Tier I: Secure Visitor Entrance (With Indirect Communication)
The secure visitor entrance consists of locked exterior door(s) (or the interior doors of a vestibule) with a means of indirect communication to staff via an intercom or phone system.
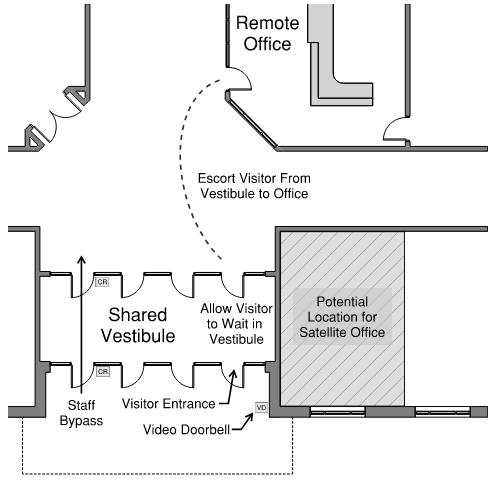
While this entrance may provide direct access to the office area, where access is directly into the main portion of the building, procedures must be developed to augment the lacking physical security layers. In the case of a remote office, staff members should escort visitors from the secure visitor entrance to the office area, or elsewhere in the building.
It is highly encouraged that a video communication system is installed as it provides staff with a visual means of communication with visitors.
Existing buildings that have an office that is remote from the main entrance, and for which it may be cost prohibitive to move the entire administrative function to the front of the building, should consider the use of a satellite reception area, whereas the entrance sequence provides a reception/waiting area, but visitors would need to be escorted to the main office.
Tier II: Shared – Semi-Secure Visitor Entry Center
The “shared – semi-secure visitor entry center” consists of a shared main entrance vestibule with direct access to the office area, along with secure direct communication and access to the visitor management system.
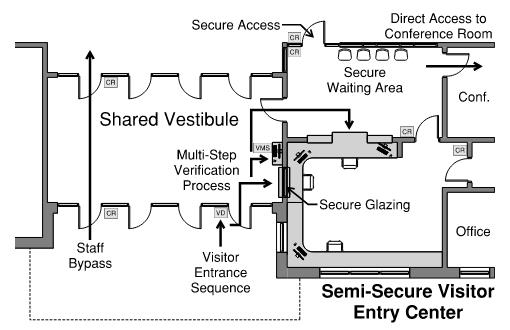
Provisions should also be provided for a means to safely transfer items between staff and visitors. At a minimum, this can be accomplished with a table in the secure space, but consideration should be given to increased levels of secure transfer.
In existing buildings where it would be unfeasible to install a form of secure direct communication like a teller window, a video system should be utilized. Wherever possible, staff should have a direct line of sight to the vestibule area to maintain some semblance of direct communication.
This area would be considered only “semi-secure,” as it would be possible for someone to bypass the office area and gain access directly to the building.
Tier III: Separate – Secure Visitor Entry Center
The “separate – secure visitor entry center” consists of a separate visitor entrance into a secure space with direct access to the office area, along with secure direct communication and access to the visitor management system.
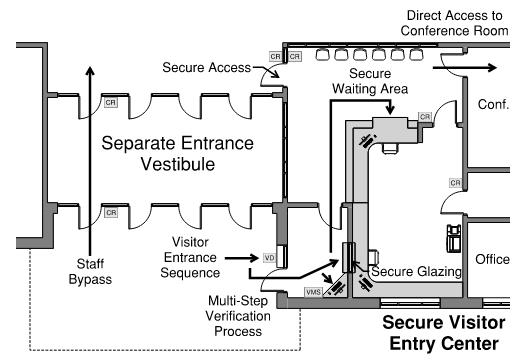
The ability to securely transfer items between visitors and staff via a teller’s tray and package transfer box, should also be provided.
Tier IV: Secure Administration Zone
In addition to the separate – secure visitor entry center, a secure administration zone ensures another layer of separation from the main portion of the building by providing access to a conference room and restroom, at minimum. Consideration should be given to the size and quantity of conference rooms that may be required, along with direct access to certain offices. All other administrative offices should be secured separately from the areas to which a visitor would have access. Doors between the secure administration zone and the main portion of the building are to have access control hardware installed to allow staff to remotely grant entry to these spaces.
While it is possible to have a secure administration suite with the shared-secure visitor entry center, this would not be considered a Tier IV recommendation as the vestibule would still be considered only “semi-secure.”
Security Enhancements
There are a number of security enhancements that can be incorporated to increase the overall level of security in the visitor entrance sequence at ALL PASS tier levels. In addition to the teller window and secure package window transfer discussed above, the inclusion of security glazing is a common enhancement.
It is worth noting that while upgrading the security level of glazing, the same rating must be applied to the surrounding walls. In addition to the secure visitor entrance and main entrance, all other exterior doors, particularly secondary entry points, should be considered as well.
The appropriate level of protection should be determined through a thorough threat assessment, and a realistic understanding of the limitations of these systems is paramount.
Security Glazing
The term “security glazing” can encompass a large number of products and systems that provide increased levels of security, but it is important to understand that the glazing is only a portion of the system. Consideration must also be given to the door, door frame, hardware, lock, and surrounding wall to fully account for the security level. It is important to point out that no solution will 100% prevent a determined assailant from gaining access to the building. However, it does allow for the security principles of Deter, Detect, Delay, and Defend to be implemented.
The utilization of security glazing intends to delay an active threat, essentially buying time for resources to be deployed to defend against the threat. Each additional layer of security increases this amount of time while also creating multiple points to detect the intrusion. The overall goal is to deter an active threat from even considering an attempt at gaining access to the building by force.
Without diving too deeply into the technical aspects of glazing, the important factor to consider is what happens when the glass is compromised. Generally speaking, the most basic form of glass is “float glass,” which is created by floating molten glass over molten tin. When float glass is put through the annealing process, slowly being cooled with a blast of air on one side, it prevents imperfections and internal stresses. This annealed glass, as well as float glass, will break into large sharp pieces and fall out of the frame, creating potential cutting hazards and providing no level of security against an adversary. Strengthening glass is accomplished through a process of heating the glass to extreme temperatures, then quickly cooling the surfaces while allowing the interior to cool slowly. This changes the physical properties of the glass, creating a stronger piece of glass known as tempered glass. When tempered glass breaks, the pieces are much smaller and typically less sharp, thus reducing potential cutting hazards, but offer no real level of security, as these pieces will fall out of the frame. For the broken pieces to remain in the window frame, the glass must go through a lamination process, where two or more layers of annealed glass are joined with a thin layer of translucent material, typically polyvinyl butyral (PVB). This laminated glass is commonly referred to as “safety glass,” as the interlayer holds the broken pieces of glass together. While laminated glass is safer, it is still possible to push the broken pane of glass out of its frame or to cut through the lamination layer. What elevates glazing to the level of “security glazing” is its ability to stay in its frame and withstand forces applied to it or its ability to prevent objects from penetrating its surface.
Security glazing is most commonly categorized into two types: ballistic and force protection. These terms are applied through rigid testing procedures, and understanding how and why these procedures were developed will assist in understanding which type should be utilized.
Ballistic Glazing
Testing procedures for ballistic glazing require the system to stop a certain number of projectiles of a prescribed weight and velocity to achieve the specific rating. There is no requirement for the glazing to stay in the frame after the testing is completed, and additional projectiles are permitted to pass through the glazing after completion of the testing. This is why using the term “bullet-proof” is misleading since the glazing is only rated for a specific quantity of a certain caliber of projectile. Currently the two most commonly used testing standards are the Underwriters Laboratory (UL) 752 Standard for Ballistic Resistance and the National Institute of Justice (NIJ) Standard 0108.01 Ballistic Resistant Protective Materials. Ballistic glazing is typically fabricated from acrylic, polycarbonates, laminated polycarbonates, or glass-clad polycarbonates, whereby the type and thickness of the material are directly related to the achievable rating.
Force Protection Glazing
The notable difference with force protection glazing is that while projectiles may penetrate the glass, it is required to stay in the frame even when force is applied after the fact. Force protection glazing is typically a form of laminated glass but may also be a solid polymer. Testing standards prescribe the exact way the glass is to be compromised and the type of force and/or time frame it must resist. Ratings are achieved by either resisting a specific load or length of time or through progressive testing steps.
Historically, these tests arose from the requirements of correctional facilities and residential/commercial burglaries. This is reflected in the nature of how these tests are carried out and the devices used. New criteria have been established to test the ability of glazing systems to resist an attack after they have been compromised by high velocity projectiles. In these tests, a prescribed number of projectiles is shot through the glazing, and then forces are applied to simulate an attack. One of these new testing standards is the ASTM-F3561-22 Standard Test Method for Forced-Entry-Resistance of Fenestration Systems After Simulated Active Shooter Attack.
Protection/Security Films
Replacing existing glazing systems and frames can be an expensive endeavor. A less costly option is to install “protection” or “security films” over existing windows. These films are typically a polymer-based component that is applied to the existing glazing, and often the same material manufacturers utilize in their laminating process. However, currently there is no testing standard solely for film applied to an existing window, as the testing criteria takes the frame assembly into account. It is possible that a window with an applied film may keep the glass together; however, the entire pane of glass could be pushed out of the window frame. Manufacturers will market their films as an “equivalent” rating, assuming that the existing glass and frame will meet the prescribed testing requirements. There are also other factors that will affect a film’s performance on existing windows, particularly the quality of the field installation and the anchoring of the product beyond the frame. Security films allow a facility the ability to provide an increased level of protection on existing windows and doors, but care should be taken to understand the limitations and actual performance of these products.
As the school considers hardening the glass in exterior and/or interior doors and windows, it is important to understand the different types of glass, glazing, and films that are available. It is also important to ensure the frame for the glass is capable of withstanding the same forces after the glazing or film is installed. PASS recommends that the district contact a professional commercial window/door company when investigating adding security glazing.
At a minimum, force protection glazing should be utilized. This will ensure the glass stays in the frame even after being compromised and therefore delay an assailant from gaining access to the interior of the building. Employing higher levels of protection in specific locations can address the potential likelihood of certain threats at these locations without the school having to endure that expense throughout. For example, while force protection glazing is utilized at all exterior door locations, increasing the glazing, doors, and walls between the secure visitor entry center and the office area will provide increased protection for staff if someone fails the verification process and becomes violent. Consideration should also be given to addressing potential threats from inside the building to the office area. Incorporating force protection glazing between these two spaces will not only prevent an assailant from gaining access to the building from the office space, but also prevent a threat already in the building from being able to compromise the administrative area while staff are attempting to manage the situation.
Conclusion
By following the PASS Guidelines, schools can take a systematic approach to arranging secure visitor entrances. Many schools can easily modify existing entrances to provide a level of security while still retaining the openness of the facility. This white paper, based on the PASS Guidelines, outlines a tiered approach to provide schools and districts with a rational and intentional method to establish a secure visitor entrance. Schools can make changes immediately this way while continuing to enhance security for staff and students over time.
There are a number of security enhancements to accompany secure visitor entrance best practices, as well. Security glazing is among the most common enhancements.
Lastly, it’s important for schools and districts to have proper policies and accountability processes in place. A written policy accompanied by a staff training program is important. This creates visitor management accountability to ensure the process is followed correctly. While the visitor management process will focus on the secure visitor entry process, provisions should also include policies regarding all other exterior doors around the building.
References
1 ASTM-F3561-22 Standard Test Method for Forced-Entry-Resistance of Fenestration Systems After Simulated Active Shooter Attack
2 (NIJ) Standard 0108.01 Ballistic Resistant Protective Materials
3 (UL) 752 Standard for Ballistic Resistance
Ready to get the Guidelines?
The most comprehensive information available on best practices specifically for securing school facilities, vetted extensively by experts across the education, public safety and industry sectors.
